Installing in-ceiling speakers can transform your living space into a high-quality audio haven. It’s a task within reach for those who are comfortable with DIY projects.
Understanding the steps required can help you achieve professional-sounding audio without needing a contractor. Before you start cutting holes in your ceiling, it’s essential to plan the installation carefully. Consider the best placement to ensure optimal sound distribution throughout your room.
This guide will walk you through the process, so you can confidently set up your speakers like a pro. Whether you’re looking to enhance your home theater experience or enjoy music with pristine clarity, in-ceiling speakers offer an unobtrusive solution. By following a few straightforward steps, you can elevate your audio quality and enjoy an immersive sound environment in your home.
Evaluating Room Acoustics and Speaker Placement
To achieve the best sound quality for your in-ceiling speakers, it’s crucial to analyze room acoustics and decide on optimal speaker locations. Both factors work together to enhance audio performance and deliver a more immersive experience.
Understanding Room Dynamics
Room acoustics are influenced by the shape, size, and contents of a room. Hard surfaces like walls, ceilings, and floors can cause sound reflections, creating echoes or reverb. Soft furnishings can absorb sound, impacting clarity.
To evaluate your room, assess the materials present. Hard surfaces reflect sound, while soft surfaces absorb it. Identify areas where sound may bounce or be absorbed excessively.
Adjusting the balance between these surfaces can help enhance the overall audio experience.
Use furniture arrangements to manage sound reflections. For instance, adding curtains or rugs can soften sound in echo-prone areas. Understanding these dynamics allows you to tailor the environment for better sound quality.
Determining Optimal Speaker Positions
Positioning in-ceiling speakers is an essential step for clear sound. Place speakers where they can evenly distribute sound across the room, avoiding areas prone to echo or absorption. Ideally, the speakers should be spaced equally, providing balanced coverage.
Start by identifying the primary listening area. Center the speakers around this space to enhance the listening experience.
It’s important to avoid blocking sound paths with large furniture or decorations.
Consider potential obstructions like beams or low ceilings. These can affect how sound travels and reaches listeners.
By strategically placing your speakers, you ensure a richer and more consistent sound quality throughout your room.
Selecting the Right In-Ceiling Speakers
Choosing the right in-ceiling speakers involves understanding their types, power, sensitivity, frequency response, and impedance. Each aspect affects the overall performance and suitability for specific uses.
Speaker Types and Their Uses
In-ceiling speakers come in various types designed for different purposes. Mono speakers are great for background music in small spaces. They play the same sound from each unit, keeping it simple for areas like hallways or bathrooms.
Stereo speakers, on the other hand, deliver left and right audio channels from a single unit. These are ideal for larger rooms where space is limited for multiple speakers.
If you’re setting up a more immersive system, consider dual voice coil speakers. They provide fuller sound by handling two audio channels separately. Knowing your room size and purpose will help you pick the right type for your needs.
Power Handling and Sensitivity
Power handling refers to the limit of how much power a speaker can handle without damage. This is expressed in watts. For small rooms, speakers with lower power handling can be suitable, while larger rooms may need speakers with higher power ratings.
It’s important to match the speaker’s power handling with your amplifier’s output.
Sensitivity is measured in decibels (dB) and indicates how much sound a speaker can produce from a given power input. Higher sensitivity means the speaker is more efficient, producing louder sound at lower power. This is useful in spaces where you want impactful sound without using too much energy.
Aim for a balance between power and sensitivity for the best performance.
Frequency Response and Impedance
Frequency response describes the range of sound frequencies a speaker can reproduce. It’s usually measured in hertz (Hz) from the low bass to the high treble. A wider frequency range means the speaker can deliver richer and more detailed sound.
Ensure the frequency response fits the type of audio you plan to play, whether it’s music or voice.
Impedance, measured in ohms, affects how much electrical resistance a speaker offers to the amplifier. Common home speakers have an impedance of 6 to 8 ohms. When selecting, make sure the impedance matches your amplifier’s specifications to avoid damaging the speakers or reducing sound quality.
Required Tools and Materials
When installing in-ceiling speakers, you’ll need specific tools and materials to ensure the job is done correctly. These items will help you prepare your space and make the installation process as smooth as possible.
Gathering Your Tools
Start by collecting the tools you will need. Essential tools include a drill, utility knife, and stud finder.
A drill is crucial for cutting holes and securing speakers. The utility knife helps with clean cuts around the ceiling area. Use the stud finder to locate beams or obstructions in the ceiling.
A measuring tape is useful for precise placement. It’s important to have a wire stripper for preparing speaker wires.
A screwdriver set is necessary for securing speakers and other attachments. Having all these tools ready will help you avoid delays during installation.
Materials Checklist
Gathering the right materials is equally important. Start with in-ceiling speakers appropriate for your space.
Speaker wire is needed to connect your speakers to an amplifier or audio source. Consider the length to ensure full coverage without shortages.
Wire connectors are essential for safe electrical connections. You might also need junction boxes to keep wires organized and secure.
For mounting, speaker brackets may be required if your speakers don’t come with them. Make sure to have some drywall repair compound in case any patching is needed after cutting holes.
Having these tools and materials prepared before you begin can help ensure a successful installation, allowing for a seamless setup and superior audio performance.
Preparation and Safety Precautions
Before you start installing in-ceiling speakers, get ready by securing the work area and wearing the right safety gear. It’s important to have a clean and organized area to prevent accidents. Safety gear like goggles and gloves protect you while you work.
Securing the Work Area
Start by clearing the area where you’ll be working. Remove any furniture or items that might get in your way. Lay down dust sheets to protect floors and furniture from dust and debris.
Identify any potential hazards, such as exposed electrical wires. Make sure all necessary tools are within reach and organize them neatly. This ensures you don’t have to leave your spot often, reducing the risk of having tools on the floor that could cause trips or falls.
Consider using a ladder or scaffolding to reach ceiling areas safely. Ensure it’s sturdy and placed on even ground. Double-check that the electricity is turned off to avoid any risks of electrical shock.
Safety Gear and Best Practices
Wearing the right safety gear protects you from various risks. Safety goggles shield your eyes from dust and debris. Gloves provide a better grip on tools and protect your hands from cuts.
Dust masks are important if you’re cutting into the ceiling material, as they prevent inhalation of dust particles. Ear protection might be needed if you’re using loud power tools.
It’s smart to work with a partner. A second pair of hands can help stabilize ladders or pass tools, making the job smoother and safer. Plan your work carefully to minimize the need for repetitive movements that could cause strain or injury.
Speaker Installation Process
When installing in-ceiling speakers, you will need to make precise cuts for the speaker openings, run the necessary wiring, and securely mount the speakers. Accurate measurements and attention to detail are crucial in each step to ensure optimal sound quality and a professional finish.
Cutting the Ceiling Openings
First, gather the tools you’ll need, such as a drywall saw, measuring tape, and a pencil. Start by marking the locations where your speakers will go. Measure carefully to avoid cutting near joists or existing wires.
Use a template, often provided with speakers, to outline the area you need to cut. Make sure the circle is even and has room for the speaker to fit snugly. It’s advisable to start with a small cut and adjust as needed.
Once you’re sure about the placement, carefully cut along the marked lines using your drywall saw. Wear protective eyewear to avoid dust irritation. After cutting, check the opening for rough edges and smooth them out for a clean finish. This step is crucial to ensure the speakers sit flush with the ceiling.
Wiring the Speakers
Before running the wires, identify the best route to connect the speakers with your AV receiver. Use a fish tape or wire puller to guide the speaker wire through the wall or ceiling.
Ensure you use the correct gauge wire for the distance involved—typically, 16-gauge wire works for most home installations. Label each wire to avoid confusion when connecting to the receiver. Strip about half an inch of insulation from the ends before fastening them.
Secure the wires using cable ties to prevent them from moving around once installed. Double-check connections to ensure there are no loose ends that could affect audio quality. By doing so, you maintain a tidy setup and ensure the longevity of your wiring.
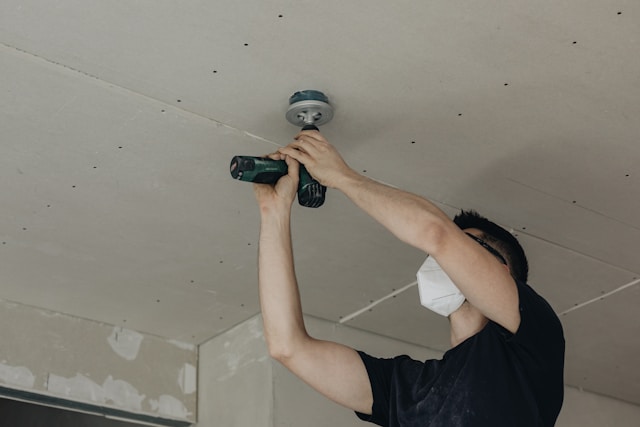
Mounting the Speakers
With wiring complete, it’s time to mount the speakers. Insert the speaker into the opening, ensuring the wiring is properly connected and secured. Some speakers come with clamps that hold them in place; tighten these slowly to avoid damaging the ceiling.
Listen for any rattling noises once mounted—these indicate loose fittings. Adjust the clamps or the speaker position if necessary. Once satisfied with the fit, test the system to ensure everything works as expected.
Consider adjustments for optimal sound distribution. With Tech4U’s in-ceiling speakers, you’ll enjoy top-quality sound without taking up valuable space. Installation in this manner ensures your sound system not only blends seamlessly into your home but also delivers the best possible performance.
Finishing Touches and Cleanup
After installing in-ceiling speakers, it’s important to focus on the final details to ensure everything looks neat and functions properly. This includes sealing any gaps and cleaning up the area to leave a polished appearance.
Sealing and Cosmetic Fixes
Once your speakers are installed, examine the edges. Look for any gaps between the ceiling and the speaker. Use a suitable sealant to fill any spaces. It helps prevent dust buildup and improves sound quality by sealing the area.
Check for any scratches or marks around the installation site. A small amount of paint, matching the ceiling, can cover up these marks. This will maintain the visual appeal of the ceiling.
Ensure the speakers sit flush with the ceiling. Adjust if necessary. Double-check that all screws and mounts are secure. Neatness and attention to detail at this stage can significantly enhance the overall look.
Disposal of Debris
During installation, debris such as dust, wiring scraps, and packaging may accumulate. Collect any leftover materials and properly dispose of them. This keeps your space tidy and prevents any potential hazards from loose materials.
Consider recycling any packaging or wire scraps. Many local facilities accept these materials, contributing to environmental conservation efforts.
Finally, vacuum the area to remove dust and small particles. This not only enhances cleanliness but also guarantees that the audio system isn’t compromised by dirt or debris left behind. A clean and orderly space ensures your new in-ceiling speakers are the center of attention, delivering the best sound experience possible.
Testing and Calibration
Testing and calibration are essential steps to ensure your in-ceiling speakers deliver the best possible sound. You’ll conduct sound tests and adjust settings to optimize audio quality.
Performing Sound Tests
First, gather the necessary equipment, such as a sound source and an audio test track. A variety of tests can help you evaluate all frequencies. Play a track that includes both low and high tones.
Move around the room as the track plays. Listen in multiple positions to assess the sound’s consistency and quality. Ensure that bass and treble are well-balanced.
Using a sound level meter for precise measurements can be helpful. Measure different areas to detect any significant volume discrepancies. Identify spots where adjustments might be needed for better quality.
Adjusting for Optimal Sound
Once you’re done testing, it’s time to make adjustments. Start with your speaker’s tone controls. Adjust these to balance the highs and lows according to your preference.
Next, consider adjusting your equalizer settings. Fine-tune them to minimize any peaks or dips in sound. Small tweaks can dramatically enhance your listening experience.
If possible, adjust the position of your speakers slightly. This may improve audio distribution in the room. For complex adjustments, seek professional assistance if needed to perfect your setup.
Troubleshooting Common Issues
When installing in-ceiling speakers, encountering problems is not uncommon. Here are some common issues you might face and how to address them:
No Sound from Speakers
- Check Connections: Ensure that all cables are securely connected to both the speakers and the amplifier.
- Inspect the Amplifier: Verify that the amplifier is powered and set to the correct input source.
- Test with Another Device: Connect a different device to rule out issues with the input source.
Poor Sound Quality
- Adjust Speaker Placement: Make sure the speakers are placed symmetrically and not blocked by any obstructions.
- Examine Speaker Settings: Check the bass and treble settings on your audio system and adjust them for clarity.
- Verify Cable Quality: Use high-quality cables to prevent signal loss.
Uneven Sound Distribution
- Speaker Balancing: Use the balance settings on your amplifier to adjust the sound output between speakers.
- Room Acoustics: Consider room furnishings and layout, as they can impact how sound travels.
Interference and Static
- Avoid Overlapping Frequencies: Ensure that the speakers are not too close to other electronic devices that might cause interference.
- Inspect for Damaged Cables: Look for any wear or damage on speaker cables and replace them if necessary.
Top Tips at a Glance: Installing In-Ceiling Speakers
- Plan Speaker Placement for Optimal Sound
Evaluate room acoustics and place speakers strategically to ensure even sound distribution and minimize echoes or absorption. - Choose the Right Speakers for Your Space
Select speakers based on room size, purpose, power handling, sensitivity, and frequency response for the best performance. - Gather Tools and Materials Before Starting
Essential tools include a drill, utility knife, stud finder, and wire stripper. Don’t forget speaker wire, connectors, and mounting brackets. - Prioritize Safety During Installation
Clear the workspace, use a sturdy ladder, and wear safety gear like goggles, gloves, and a dust mask to prevent injuries. - Follow a Step-by-Step Installation Process
Measure and cut ceiling openings carefully, run and secure wiring, and mount speakers snugly for a professional finish. - Test and Calibrate for Perfect Sound
Conduct sound tests, adjust equalizer settings, and fine-tune speaker placement to achieve the ideal audio experience.