Thinking about getting Starlink Internet? Here’s what the installation process looks like—and it’s simpler than you might think.
First, your location will be checked to make sure there’s a clear view of the sky. This is key for the satellite dish to work at its best, giving you the fastest and most reliable connection Starlink offers.
Next, the satellite dish is securely installed on a stable surface and connected to a special router. Once it’s all set up, you’ll have high-speed internet ready to go throughout your space.
At Tech4U, we handle the entire process for you, making it quick and hassle-free. Starlink can revolutionize your internet experience, especially if traditional services fall short. With over a decade of experience, we make sure you get connected smoothly and efficiently.
Let’s take a look at Starlink and the ways it’s transforming the internet as we know it.
Overview of Starlink Internet
What Is Starlink?
Starlink is a project developed by SpaceX to deliver reliable internet service through a constellation of satellites. Unlike traditional internet that relies on cables and towers, Starlink uses a vast array of small satellites. These satellites can provide internet access even in places with limited connectivity options.
This service is beneficial for rural areas and places where installing cables is challenging.
Starlink offers high-speed broadband internet with low latency. The service is designed to offer broadband-level speeds to users. Because the satellites orbit closer to Earth than traditional satellites, the data travel time is reduced, resulting in faster internet.
How Does Starlink Work?
Starlink functions by deploying numerous satellites that orbit the Earth, forming what is called a “constellation.” These satellites communicate with ground stations and user terminals, known as Starlink dishes. The signals transmitted from these satellites provide internet connectivity directly to the user’s dish.
The installation typically includes setting up a satellite dish on a stable surface, which can be managed by professionals like Tech4U. This dish connects to a router, distributing the signal throughout the premises.
The system provides reliable internet even in adverse weather conditions. Users can enjoy streaming, online gaming, and other internet activities with minimal interruptions.
Pre-Installation Essentials
Before setting up your Starlink internet, making sure your site is ready, understanding the equipment, and choosing the best location for installation are vital steps.
Site Survey and Preparations
The first step involves conducting a thorough site survey. You need to identify a location with a clear view of the sky to avoid any obstructions from buildings, trees, or hills. This ensures the satellite dish receives a strong signal.
It’s also important to check if your area is covered by Starlink services. This can typically be done by entering your address on the Starlink website.
Consider potential challenges such as power availability and access for maintenance. Gathering this information upfront can save time and prevent installation hurdles.
Equipment Overview
You’ll receive a kit that includes a satellite dish, a mounting tripod, a power supply, and a Wi-Fi router.
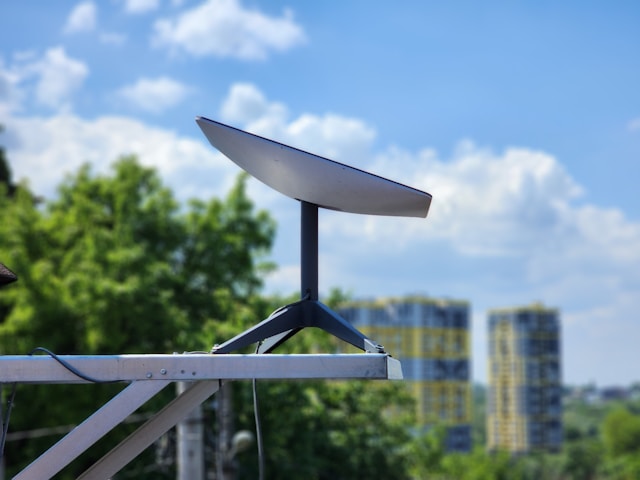
The satellite dish, often called “Dishy,” connects directly to the Starlink router. This setup allows the user to receive high-speed internet through the satellite network.
Familiarize yourself with each component to understand its role in the installation.
The router broadcasts Wi-Fi, enabling wireless connections for all devices in your home. The equipment is designed for easy setup, but having a basic understanding of how each part connects will facilitate a smoother installation process.
Choosing the Installation Location
Choosing the right location is crucial for optimal performance. The satellite dish should be mounted on a stable surface with unobstructed views.
Consider areas like rooftops or high points in your yard. Ensure the dish is securely mounted to withstand weather conditions.
Avoid installing the dish near metal structures, as they might interfere with signals.
It’s also important to think about the accessibility of the dish for any future maintenance or adjustments. Confirm the dish’s position aligns with Starlink’s guidelines for satellite orientation to guarantee the best internet service.
The Installation Process
Mounting the Starlink Dish
The first step is finding a suitable location for the Starlink dish. It must have a clear view of the sky without any obstacles like trees or buildings, which can interfere with the signal. This ensures an uninterrupted connection to satellites.
Mount the dish on a stable surface, such as a rooftop or wall, using the hardware provided.
Choosing the right spot is crucial. Poor placement can result in weak signals and slower internet speeds. Use a mounting kit designed for the dish to ensure it is secure and properly positioned.
This task requires attention to detail, so you may want to consider professional help if you lack experience with installations.
Aligning for Optimal Signal
Once the dish is securely mounted, it must be aligned correctly to receive the best signal.
Starlink offers guidance on achieving optimal positioning. This usually involves using a smartphone app to check for the strongest connection point.
The app helps find the perfect angle and tilt for peak performance.
Proper alignment reduces the chance of signal loss and boosts internet speeds significantly. You’ll need patience and precision here, as even a slight misalignment can impact performance.
Adjust the dish slowly and test the connection until you achieve the best possible reception.
Connecting to Power and Devices
After aligning the dish, connect it to the power source. The dish needs to be plugged into a power outlet, and it’s important to ensure the cables are protected from weather conditions.
Once powered, the dish connects to the Starlink router.
Connect your devices to the Starlink router via Wi-Fi or Ethernet. Most setups involve a straightforward connection process, similar to traditional routers.
Following these steps will enable your devices to access high-speed internet. Check the settings and test the connection to make sure everything is functioning correctly.
Post-Installation Setup
After setting up your Starlink satellite dish and router, there are a few important things to do to get everything running smoothly. This includes configuring your Wi-Fi settings and making sure the Starlink app is ready on your device.
Wi-Fi Configuration
Once your Starlink equipment is in place, it’s important to configure your Wi-Fi settings.
First, connect your device to the Starlink network. You’ll find the network name and password on the router or in the documentation provided. Use these details to access the network on your computer or smartphone.
After connecting, open a web browser and type the router’s IP address, often found in the manual. This will take you to a settings page where you can customize your Wi-Fi name and set a new, secure password.
It’s crucial to choose a strong password to protect your network.
Consider changing the Wi-Fi channel if you experience slow speeds or interference, especially in areas with multiple routers. This will ease congestion and can improve the performance.
Downloading the Starlink App
The Starlink app is a vital tool for managing your internet connection.
Download it from Google Play or the App Store to get started. Once installed, the app will guide you through the final setup stages and help you monitor your connection.
The app also features a built-in tool to check the positioning of your dish. It can alert you about obstructions that might affect your signal, ensuring optimal performance.
Additionally, the app provides data usage statistics and signal strength and offers troubleshooting options if the connection isn’t working as expected. Keep the app updated to access the latest features and improvements.
Performance Expectations
When installing Starlink Internet, users often wonder what kind of performance they can expect. Key aspects include speed, latency, and network reliability. These factors are crucial for understanding how the service will meet daily internet needs.
Speed and Latency
Starlink advertises download speeds between 50 to 150 Mbps. You might experience variations in speed depending on your location and network congestion. Speeds can fluctuate, particularly during peak usage times.
Latency, or delay time, is another critical factor. Starlink’s low-Earth orbit satellites offer latency as low as 20 to 40 milliseconds. This is significantly lower than traditional satellite internet.
Lower latency is beneficial for activities like online gaming and video calls, which require quick data exchange.
Network Reliability
Starlink aims to provide reliable internet, even in rural or remote areas. Its satellite network covers vast regions, providing connectivity where conventional broadband may fail.
However, weather conditions like heavy rain or snow can impact signal quality temporarily. Trees, buildings, or other obstructions can also affect the connection.
Over time, service reliability is expected to improve as more satellites are launched and the network expands.
Maintenance and Troubleshooting
To keep your Starlink internet running at its best, regular check-ups and quick fixes for common problems are essential. This section covers practical tips for ongoing maintenance and addresses frequent issues users may encounter.
Routine Maintenance Tips
Regular cleaning of the satellite dish is key to maintaining strong signal reception. Dirt, snow, and other debris can interfere with the connection.
Gently clean the surface with lukewarm water and a soft cloth.
Keep the surrounding area clear by trimming any trees or plants that could potentially block the signal. This ensures nothing obstructs the line of sight to the sky.
Regularly check your setup for hardware issues. Make sure cables are in good condition and connectors are securely attached.
Common Issues and Solutions
One common issue is intermittent connectivity. This can happen due to satellite obstructions or network configuration errors. Ensure there are no physical obstructions, and restart your router to re-establish connections.
Weather can also affect performance. In the case of heavy rain or snow, the connection might slow down. If this happens frequently, consider installing a heater to keep the dish clear.
Sometimes, a simple software update or reboot can resolve persistent connectivity problems. If these solutions don’t work, it may be time to contact professional support to dig deeper into the problem.
Customer Support
When installing Starlink Internet, understanding customer support is key. You’ll find details on how to contact services for assistance and learn vital info about warranty and technical support.
Accessing Customer Service
If you need help with Starlink, reaching out for support is straightforward.
You can contact them through the official website or app. This lets you submit queries, report problems, and ask for specific help.
Using online support options like chat or help articles is also quick. It provides guidance about setup, coverage issues, and troubleshooting.
Having these resources readily available ensures you can address problems efficiently. This will help minimize any downtime in your internet service.
Warranty and Technical Support Information
Starlink offers a limited warranty for their equipment. This usually covers defects in materials and workmanship for a specific period after purchase.
Ensure you understand what is included in the warranty and how to make a claim if needed.
Technical support provides assistance with installation and performance issues. For compatible services, experts can help evaluate the location for an unobstructed sky view and suggest optimal placement for the satellite dish.
Staying informed about support options helps you maintain consistent and reliable internet service.
Your Starlink Journey Starts Here
Getting Starlink Internet installed is a straightforward process that opens up a world of high-speed, reliable connectivity, especially in areas where traditional options fall short.
From choosing the right spot for your dish to setting up your Wi-Fi, every step is designed to ensure you’re up and running quickly and efficiently.
With our professional expertise, you can skip the guesswork and enjoy a seamless installation experience. Whether you’re streaming, gaming, or just browsing, Starlink is here to keep you connected like never before.